Golden to Rogers Pass
Aaron Chance, Jared Gross, Troy Jungen, Douglas Sproul
January 28, 2007
Having spent four incredible years living in Golden, BC, I often wondered if it was possible to give 'er from The Horse to The Pass in a long day. Even now it remains one of my favourite tours. High value and highly recommended, especially as a multi-day.
Important: A significant portion of this traverse travels within Glacier National Park. National Park Regulations apply. To enter the terrain around Avalanche Mountain requires a Winter Permit. To park at Mortar Restricted Parking requires a Winter Parking Permit. And of course, you'll need a National Park Pass. You can learn about the Winter Permit System at the Parks Canada website.
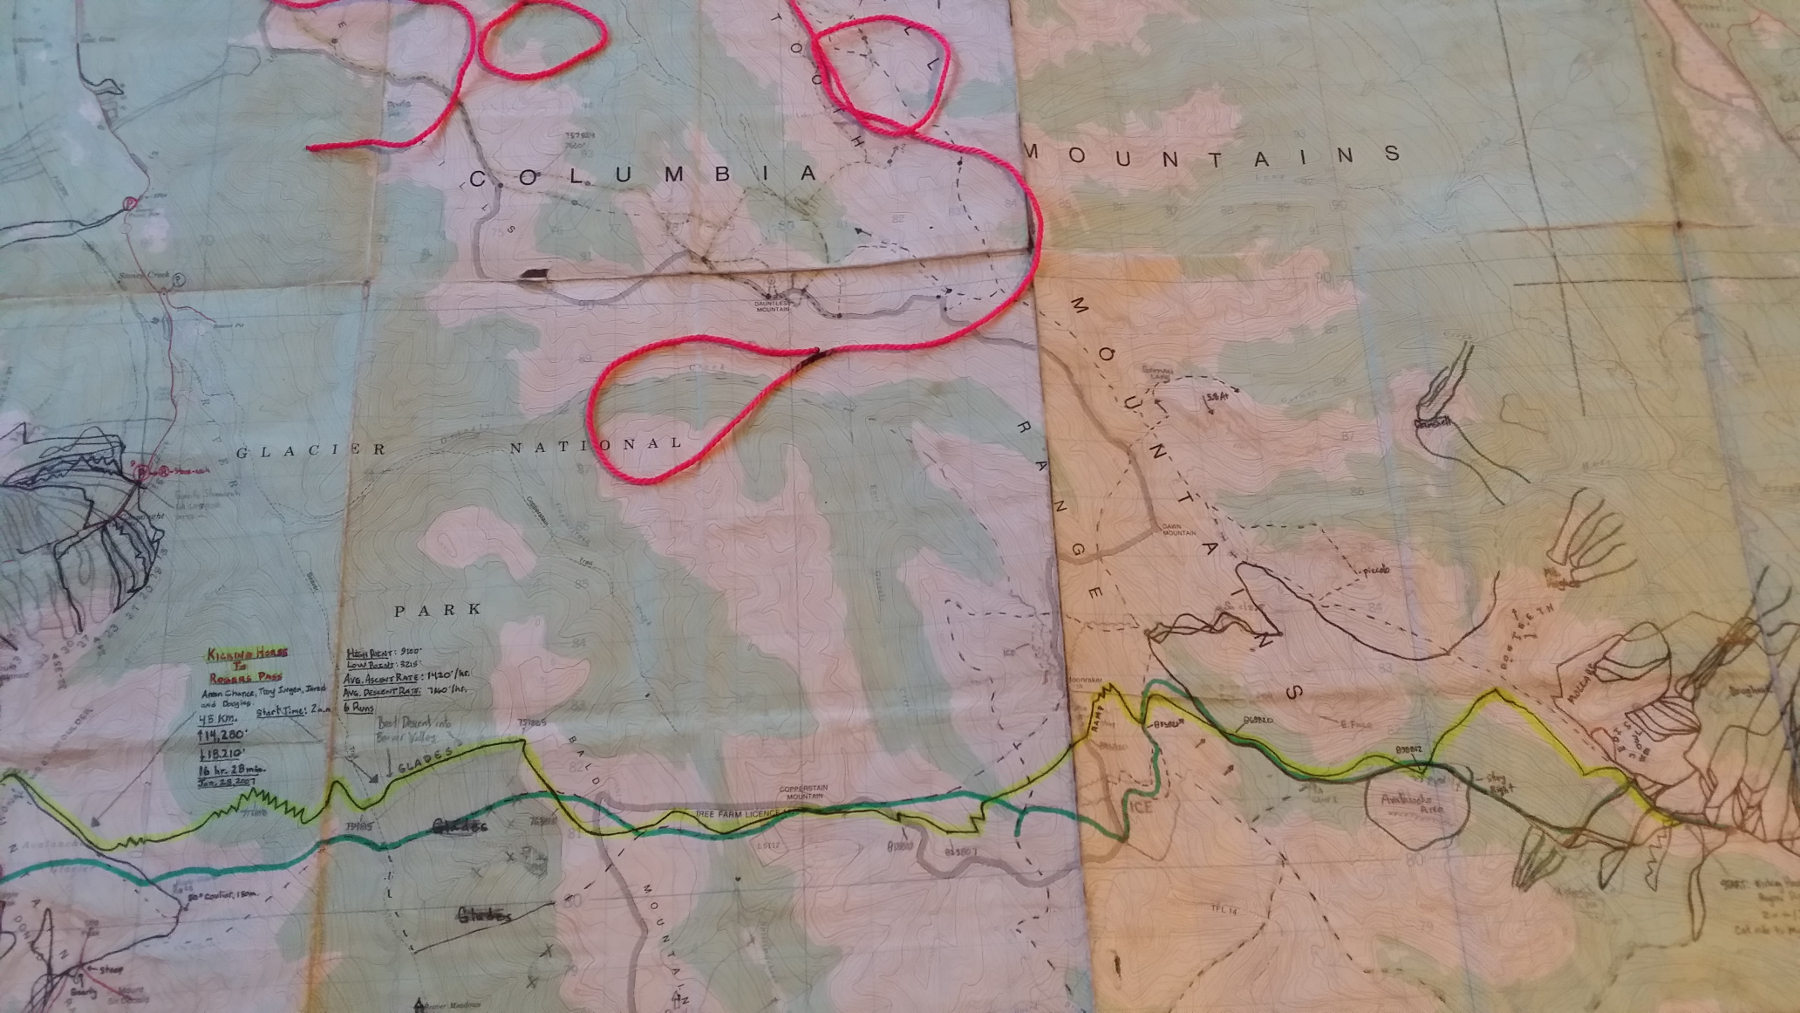
Depart: Kicking Horse Resort, My Blue Heaven at 2 a.m.
Ascent: 14,280'
Descent: 18,210'
Length: 45 KM
Total Runs: 6
Total Time: 16 hours 28 minutes
High Point: 2773m
Low Point: 980m
Stoke Factor: 10
It took years to piece the descent into Beaver Valley together. It really is the only reasonable descent into the Beav-. It turned out to be a great run! A 1200 metre glade run! Amazing given the characteristics of this flank of The Purcell Range which is generally steep and gnarly bush.
Don't be alarmed: Although this particular tour was a speed mission, it's highly recommended as a multi-day tour. This is a moderately difficult traverse. Or, to put it another way; if you have some experience with the other traverses in the Selkirks, then you won't find it difficult. If on the other hand, you have done say; The Wapta Traverse, then you may find this a bit more difficult....
Start
Kicking Horse Mountain Resort, top of My Blue Heaven. A perfect way to start a traverse. With an awesome run. Woooohooooooo!
Time
Two, three or even four days would be great. The skiing along the way is excellent.
Camping
There are many good sites for camping along the way.
Water
Get it before you leave Canyon Creek because it's likely that you will not see open water again until Beaver River unless you drop a bit into the creeks to camp.
Beaver River Crossing
Generally speaking and from a historical perspective, anywhere below Glacier Circle can be difficult, depending on the type of season. That being said, I personally know of four parties that have crossed the Beaver this low and all reported no problem. Low snowpack and/or warm seasons can obviously inflate the chances of running into difficulty.
Conditions
It's best to hit this tour when mountain conditions are in their prime. Being an east>west traverse, the west faces obviously have to be in good shape. Otherwise, you'll be whackin' down wind crust and facets, cursing the author.
Ending
This is likely the crux; penetrating the Sir Donald Range. It doesn't matter which way you go, it is a memorable tour! The blue route shown on the map is the route described in this story. Other parties have ended the trip in various ways (See below). The Uto Glacier is the most challenging but totally amazing.
Although the Avalanche Glacier is overall a mellow glacier, it's the toe, the so called Eagle Glacier that is more of a challenge. We had minimal rescue gear so we chose the route we took onto the Avalanche Glacier to avoid the tongue. The route we took goes but it is a steep shoulder and it's no gimme. It also felt a bit out of sync with the rest of the tour, but we didn't care.
Therefore, that section of our trip is not recommended. Take either the Uto or Eagle route. If we had more gear, we would have surely gone up either the Uto or Eagle Glacier routes.
The traverse is short but it packs full value. A rarity with traverses; all of the descents are excellent, given good conditions. Good training ground for a Grand Traverse.
We got a complimentary snowcat-assist to the top of My Blue Heaven (thanks so much for that you guy's!) and at 2 a.m., we pointed our boards into Canyon Creek and we were on our way. Under the influence: of a full moon of course!
Troy sought the recommendation of our good friend Jeff Gertsch of Purcell Heli Skiing. Having grown up with the legendary Rudi as his dad, Jeff knows the area like the back of his hand. He suggested the plan of avoiding too much valley bottom travel.
We took his advice and skootched over to The Ozone and dropped into a short run on the west side and then put the skins on at treeline and traversed our way over to the northeast and found a descent that brought us to valley bottom. Thanks Jeff, it worked great.
Then we made our way up valley to the fist crux: the east face of Moonraker. As usual, we had little to no information other than what we were able to piece together over the years. And of course, in good Gulo style, it was dark for the crux.
Having reached the high col of Moonraker, we waited for the sun to rise.
As it always does, the sun rose and we were treated to a quality sunrise from one hell of a vantage point; just below the summit of Moonraker. Awesome!

Time to shred. The image below shows the bowl that we squeaked into on the west face of Moonraker from the high col. A quality, straightforward powder run to valley bottom.
The conditions for this tour were absolutely perfect. Amazing snow quality on all aspects and elevations as well as bomber snow stability allowed us to experience the trip of a lifetime.
The east face of Copperstain. We gained the col and wrapped around the backside, basking in the welcomed sun. Route shown.
And on to the summit of Copperstain. Awaiting us was a fun descent: The perfect cone feature of Copperstain's west face! Short but oh so good.
There are a lot of mountains that have good views out there. Copperstain/Bald Hills is one of the best that I have ever seen. Wow!
Our route shown above in blue up the Avalanche Glacier.
Moonraker west face. Descent route shown in red.
The cinder cone is the west face of Copperstain. What an awesome run!
Cruising the Bald Hills. Sir Donald in background.
It's a long way from valley bottom to the high col on Avalanche which is basically just below the summit. The usual sting in the tail. We definitely plan to be be high when the sun either goes down or comes up. That doesn't always happen. When it does, there's nothing like it. High grade sunshine. Pushing as hard as you can and literally giving it all you got. This is about much more than just having fun. For us, it's the classroom of life. "Do I have it, can I do it?"
Last push. High on the Avalanche Glacier.
Yeah buddy! Troy having an experience with Uto and Sir Donald behind.
And we come around the corner to this:
Last Run: Avalanche Mountain and North Glacier
Our last run was 1380m/4527' down the North Glacier and into Shoulder Valley Path, AKA The NRC Gully in stellar conditions. The conditions were so good that halfway down after it was dark, we didn't even bother with the headlamps. Such a cool experience: Braille-skiing! This exit was chosen because it ends at the true summit of Rogers Pass, the Mortar Parking Area. Golden to Rogers Pass; what a sweet tour!
Others
After our tour, I couldn't stop talking about how good it was so, some friends went and checked it out. First was Jon Walsh and Cody Lank, both of Golden, BC. Cody left a little early and camped in upper Canyon Creek and managed a descent of Moonraker's north face, solo. Nice work Cody!
Jon met up with him the next day and they sent it from Canyon Creek to Rogers Pass in a day. In an email correspondence, Jon described exactly the same finish to a magical tour:
“...The next day we went back up Moonraker, dropped in the west side at first light and made it to the top of the last descent as it got dark. Had one of the most amazing 5000’ powder runs under the full moon to the pass! It was about Dec 28/29...”
Images below are courtesy of Jon Walsh
©Jon Walsh | AlpineStyle.ca
Cody Lank in Canyon Creek | ©Jon Walsh
Cody Lank on Moonraker west face | ©Jon Walsh
Summit moonraker | ©Jon Walsh
Sunrise | ©Jon Walsh
Cody Lank shreds Copperstain west face | ©Jon Walsh
Cody Lank shreds Copperstain west face | ©Jon Walsh
Cody Lank descending Beaver Valley Glades | ©Jon Walsh
Chris Delworth and Conor Hurley also recently put their own twist on the tour. Their first variation was the col to the south of our col on Moonraker. It is marked on the map as orange. Also, instead of dropping the Beaver Valley Glades off the Bald Hills, they did a direct descent of the steep gully system just west of the summit. They had to do a short rappel and it's also not recommended. They continued on and finished through the Sir Donald/Uto col and out the Asulkan Valley.
map
The map image below is created from 1: 20,000 maps a bunch of years ago now. It is a large file and detailed. Therefore, it cannot 'fit' on this page. There are two separate files available below if you would like to download the map. The two maps are identical except for scaling and hence resolution. There may be discrepancies, use good judgement if you use this map.
Scale: 1: 20,000
Contour Interval: 20 metres
Datum: NAD83